October 28, 2026
How to ollie higher
Most skaters stall at ankle height. Three mechanics control how high you go, and most people are only working on one of them.
You can ollie. The board leaves the ground, you land on it, it counts. But it’s two inches off the pavement and you can’t clear a soda can. You watch clips of people popping over fire hydrants and it feels like a different trick entirely.
It’s not. It’s the same motion. The difference is in three specific mechanics, and most skaters who plateau are only training one of them. I’ve been teaching skateboarding for over 20 years and this is one of the most common walls I help people through. If you haven’t landed your first ollie yet, start with my step-by-step ollie guide first, then come back here.
1. Pop harder and faster
The tail pop is your engine. A faster snap gives the board more upward velocity, which translates directly to height. Most intermediate skaters pop at about 60% of their capacity because they learned the ollie at a comfortable intensity and never pushed past it.
Think about the difference between tapping a ball on the floor and slamming it. Same motion, very different result. Your back foot needs to snap the tail down with real explosive force. Quick and violent, straight down. The louder the pop sounds, the harder you’re snapping.
The ball of your foot should be right at the edge of the tail, not up on the flat part. Even half an inch of misplacement costs you pop force. If you are not sure where your foot sits, look down before you pop. Then stop looking down and feel it.
Drill: max-pop sets
Do 10 ollies in a row where the only goal is the loudest possible pop. Don’t worry about height, don’t worry about landing clean. Just snap as hard as you can. Your body needs to learn what 100% feels like before you can dial it in.
2. Tuck your knees higher
The board can only rise as high as your feet let it. If your legs stay mostly straight after the pop, you are capping your height at whatever the pop alone gives you. The knee tuck is what turns a 3-inch ollie into a 10-inch ollie using the same pop.
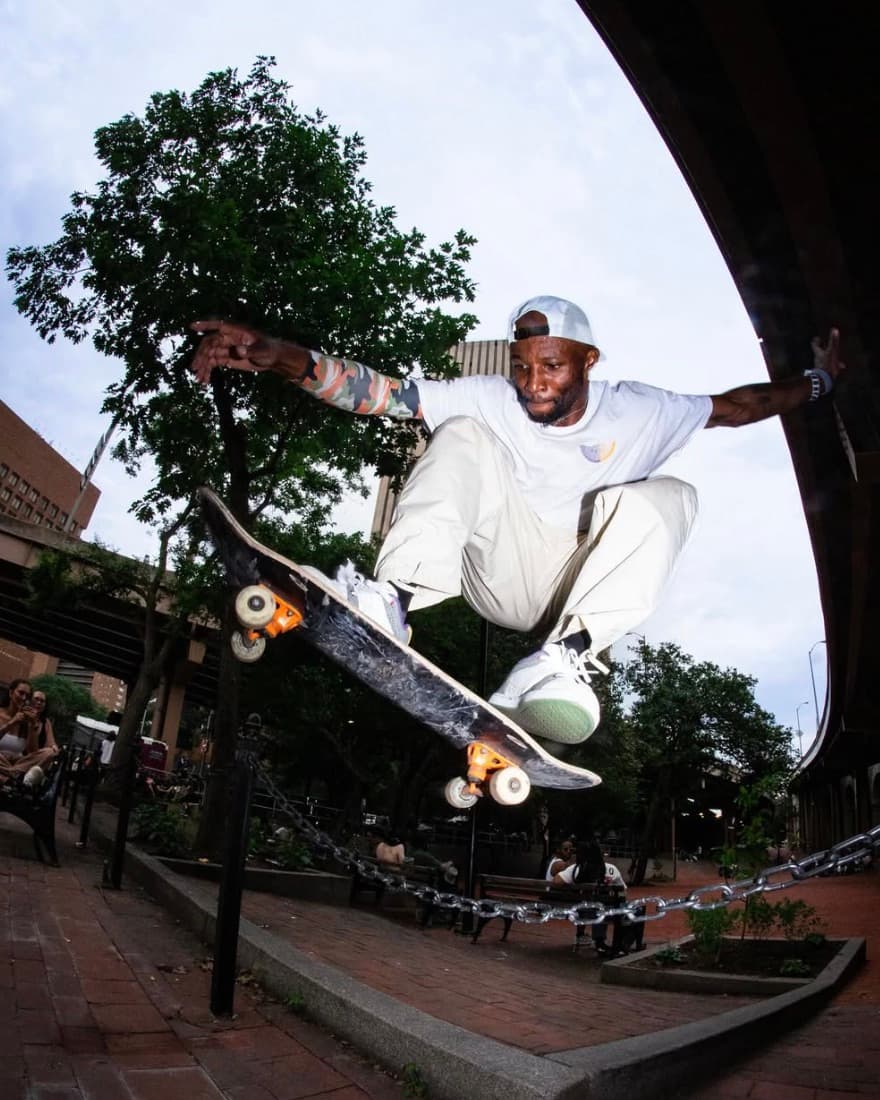
After the pop, actively pull both knees toward your chest. Not just the front knee. The back knee is the one most people forget. Your back foot just popped the tail. The natural instinct is to leave that leg extended. But if your back foot stays low, the tail stays low, and your ollie looks like a rocket with the nose way above the tail.
A level ollie at height means both knees are up. Watch any slow-motion clip of a pro ollie and you will see both knees at chest level at the peak. That is not flexibility. That is a trained habit.
Drill: jump-tuck without a board
Stand on flat ground, bend your knees, and jump as high as you can while pulling both knees to your chest. Do 10 of these. Get used to the feeling of tucking at the peak of a jump. Then do the same motion on your board. The board will come with you.
Want to try it yourself?
Book a private lesson with Leon. NYC and Westchester, all ages and skill levels.
3. Slide your front foot all the way out
The front foot slide levels the board and pulls the tail upward. Most skaters slide halfway and stop. A full slide to the nose is what gives you a clean, level ollie with real height. The further you push, the higher the tail comes.
When you first learned to ollie, you were probably happy just to get the board off the ground. The slide was short and survival-oriented. Now you need to extend it. Roll your front ankle so the outside of your skate shoe drags along the grip tape, and push that foot forward until it reaches the nose. You should feel your front foot pressing against the nose at the peak of the ollie. That pressure is what holds the board level underneath you.
If you are getting rocket ollies where the nose points skyward and the tail hangs low, this is the fix. It is almost always a front foot slide that stops short.
Drill: nose-touch ollie
Do stationary ollies where the only goal is to feel your front foot touch the nose of the board at the peak. Don’t worry about height. Just push the slide all the way out. Once you can consistently feel your foot at the nose, combine it with a hard pop and a full tuck. That is the complete motion.
Get past the plateau
Leon can see what your pop, tuck, and slide are doing in real time and give you the exact fix. One lesson is usually enough to break through.
Book a LessonPut all three together with obstacle progression
Flat-ground practice is important, but visual targets force commitment in a way that open pavement does not. Set up obstacles and work through them in order. Each one builds on the last.
- A pencil or stick on the ground. Just something to clear.
- A board lying flat. About 3 inches of clearance needed.
- A deck on its side. About 8 inches.
- A two-high stack. The foot-high mark where it starts to look real.
- A curb or low ledge. The first practical application. You can now ollie up things.
Spend a session on each level. Don’t move up until you can clear it 8 out of 10 times. The obstacle tells your brain how hard to pop. Without it, you default to whatever comfortable intensity you learned at, and you stay at the same height forever.
I use this exact progression in private lessons. Having someone watch your mechanics while you work through obstacles cuts weeks off the process. Most people are underperforming on one of the three mechanics and compensating with another. A second set of eyes finds that immediately.
Frequently asked questions
Stuck at the same height?
Private lessons in NYC and Westchester. I’ll diagnose which mechanic is holding you back and give you a focused drill plan to break through.
Book a Lesson